Monday, March 25, 2013

Day 4&5 Patterned Play online card class

Hi Guys, so finally Ive gotten around to uploading the last two cards that I did for the online card class Patterned Play. I really like this class and the ideas that the instructors and even some of the students have when it comes to creating with patterned paper. I would have never thought about such things as altering or making embellishments out of your patterns. But that is what I did. my technique is a little more subtle than the instructor but I think it was just enough to give the paper a little pizazz and well within my comfort levels. lol.

Ok so this first one is just some hearts that I stickled and then cut out some bigger hearts and burnished with glitter.

Products used:
Bazzill Marshmallow Cardstock
Colorbok Designer Paper - Hootenany
Ranger Stickles
Simon Says Stamp - Banner Die
Simon Says Stamp - Hearts Die
WOW Glitter
Versafine Onyx Back Ink Pad
 
This next card was my failed attempt at basket weaving that resulted in just strips of patterned paper on a die cut card base. however I did make my own embellishments using a piece of patterned paper and those adorable enamel dots that I've fallen in love with.

I hope you enjoyed both cards

Products used:
Bazzill Marshmallow Cardstock
Colorbok Designer Paper - Hootenany
Simon Says Stamp You Die
My Minds Eye Enamel Dots - My Girl Collection
Hero Arts - Pool Shadow Ink

Thursday, March 21, 2013

Day 1-3 Pattern Play Online Card Class

Didn't I say in my first post for online Card Class Clean & Simple that I'm no blogger? Well as you can see I haven't posted since the last day of the last class. Yikes. I really wanted to do better with blogging my work. All I can promise is to work on it!

So since I'm here I thought I'd share with you all the new class brought to you by Kristina Werner and Jennifer McGuire and its Pattern Play. This class is all about how to use pattern paper. Today was the first day I had where I could sit down and actually try some of the techniques that the ladies presented. It's day 4 already but I have cards below for days 1-3.

Hope you enjoy!!!


Day 1:  Basic Tips for using Patterned Paper


Products Used:
Neenah Solar White Cardstock
AC Amy Tangerine Yes Please 6x6 paper pack
AC Amy Tangerine Stamp  - Hey There Collection
Fiskats 1/2 Circle Punch
Fiskars 2" Scalloped Punch
Versamark Watermark Embossing Pad
Recollections Glacier Embossing powder
Stampin Up Jelly Bean Sweet Shop Brad


Day 2: Patterned Paper and Stamping
 
Products Used:
Neenah Solar White Cardstock
Authentique 6x6 paper pad - Essentials Collection
Prima 6x6 paper pad - Hello Pastel
Simon Says Stamp - Flower Friend Stamp set
Recollections - Butterfly/Flower Flourishes stamp sets
Recollections Clear Embossing Powder
Tim Holtz - Mustard Seed Distress Ink
Tsukineko Versafine Onyx Black Ink Pad
Maya Road Black Twine
 
Day 3: Hard to Use and Bold Patterns

Products Used:
Papertrey Ink Pine Linen Card Stock
Echo Park 6x6 paper pad - This & That collection
Simon Says Stamp Flower Friend Stamp Set
tsukineko Versafine Onyx Black Ink Pad
Sakura Jelly Roll Pin - White
 
Ive enjoyed all the ladies including the guest designers so far. I cant wait to start on day 4 tomorrow. right now I need some shut eye!!!
 
Goodnight

Saturday, February 9, 2013

Day 10 Clean & Simple (Final)

I'm so sad to see this day come (yesterday, I'm a day late and a dollar short) its the final day of Clean & Simple. I'll no longer have something crafty to look forward to when I get home. I'm hoping the inspiration from the class continues. I learned alot from this class and I can gladly say that every stamp set and every other item I purchased and used or NOT was well worth it!!! I look forward to the next class which I hope is fairly soon.

Final days lesson is again One stamp three ways. I of course don't have enough spare hours in the day so it was one stamp two ways for me. The first card is a paper pieced lamp set from Technique Tuesday, I think this stamp set is awesome.

Products used
Bazzill Marshmallow Cardstock
Memento Tuxedo Black Ink
Technque Tuesday Bright Idea stamp set
Maya Road Twine
Stampin Up Brights Markers

Card two is a card cut with my silhouette to mimic rays of a sun. This card took me three takes. The first I created a mask for the rays but somehow the ink bled on some of the rays and it just wasn't clean enough. The second card the sentiment didn't stamp right ( I adhered it before stamping...yikes) and when I tried to redo it it tore up my rays. so this is the third installment and if was going to have to work.

Products Used
Neenah Solar White Cardstock
American Crafts Cardstock - orange
Technique Tuesday Stamp Set- Bright Ideas
Memento Tuxedo Black Ink
Versamark Dazzle Watermark Ink
Stampin Up Ink - Pumpkin Spice
 
I hope this doesn't mean the end of my Blog. This class has kept me so inspired to share with those of you who take the time to visit that I don't want to disappoint you by stopping so I'll do my best to keep at it!
Thanks for stopping by!!!

Friday, February 8, 2013

Day 9 Clean & Simple

I Mustache you a question.......

That quote tickles me!

Today's lesson was about texture. There were several different techniques using glitter which I tried and utterly FAILED at so I decided to go with the pleated technique instead. I started out with the pleated red strip of cardstock but had no idea where I was going with it until I looked up on my craft desk cubbie and there is this picture of my family and on this little cubbie is a make and take I did a few weeks ago at Archivers. I thought it was the cutest little thing and I was forced to buy the Stamp and Cut set of the Mustache so I thought "Why Not?"


So that was my inspiration for this card. Only I didn't want to letter piece the whole sentiment on my stamp press (I'm somewhat lazy tonight) So I thought Id just Die Cut the letter I on my silhouette and stamp a heart......and VOILA!!!
 
Enjoy!!!!


Wednesday, February 6, 2013

Day 8 Clean & Simple

Today's lesson was fun! Self made rainbow stamps, salt technique and plaid stamping!!! oh my you should see the tutorial videos, they are absolutely awesome. I LOVE Laura Bassen plaid stamping and I cannot wait until I get a stamp that will master that technique. In the meantime I had to use the tools I had on hand. That consisted on an already made rainbow stamp pad by Colorbox which I happened to purchase some time ago and finally got a chance to use it. I think it did an awesome job. I still have an unused felt pad however so making my own stamp pad shall happen really soon. I'm just waiting on my order from Simon Says Stamp.

With today's card I was really feeling the stars I actually had to tell myself to stop because I wanted to keep adding to the card. Well now that defeats the purpose of "Clean & Simple" now doesn't it?!?!

Hope you like!!!


Products Used
Neenah Solar White Cardstock
Colorbox Paintbox Pigment Ink pad- Brights
The Paper Studio Embossin Folder- Tiny Stars
Hero Arts Stamp - CL582
Fiskars Gel Pens
Silhouette Cameo

Tuesday, February 5, 2013

Day 7 Clean & Simple

Short and sweet is how this entry will be as was my card. This was probably THE easiest card for me yet. The most time was spent cutting out the mask on my silhouette. Other than that it was easy peasy. I will admit however I had a little stamping boo boo at the top and had to go over it a couple times but it didn't completely ruin the card. So I'm happy about that.

The lesson today was using big stamps in combination with smaller stamps on a single layer.

Hope you enjoy!

Monday, February 4, 2013

Day 6 Clean & Simple

Although its Monday and I sorta get depressed by Mondays, I'm delighted I got a few cards done today. One of them being day 6 of my clean and simple class with Kristina Werner, Julie Ebersol and Jennifer McGuire. Today's lesson is Tone on Tone background stamping. Here I used a Hero Arts Cling background stamp embossed in black on black cardstock. I love how it came out. I added a white pennant banner and I die cut a little heart for some color. Now that I'm looking at it I think I should have gone with a scalloped circle for the sentiment instead because its stacked (another tip learned in an earlier class) I shall try that tomorrow!!!

Tomorrow I will venture into masking multicolor stamping as Jennifer McGuire demonstrated in class today. Come back tomorrow and get a peek at how well I did!!!


Products Used:
Black ColorBok CardStock
Versamark Watercolor Ink
Recollection Embossing Powers - Black
Hero Art Cling Stamp - CG315
Neenah Solar White Cardstock
Memento Dye Ink - Tuxedo Black
Recollections Holographic Paper
Simon Says Stamp Mini Hearts Die
Simon Says Stamp Loving Words Stamp Set

ok, so I cheated a bit and came back a day later and posted a card that I did today from yesterdays inspiration. I like kraft paper so why not!!!
Products Used:
Neenah Dessert Storm Kraft Cardstock
Memento Dye Ink Rich Cocoa
Hero Arts Cling Stamp - Number Pattern
American Crafts Cardstock - Lemon
Versamark Watermark Ink
Recollections Opaque Embossing Powder
Recollections Brown Cardstock
Fiskars Scallop Border punch

Saturday, February 2, 2013

Day 5 Clean & Simple

Friday, FUNDAY!!!!!

I couldn't wait for today to get here and the work day to be over! Today was a go wild day. No work tomorrow, don't have to get up early so I can spend the night crafting, and that's what I did. 3 cards for the class finished. a birthday card in the works and a sketch for a card challenge is in the books. I can say today was pretty productive day. Now as for these cards.........I'll let you be the judge of that!

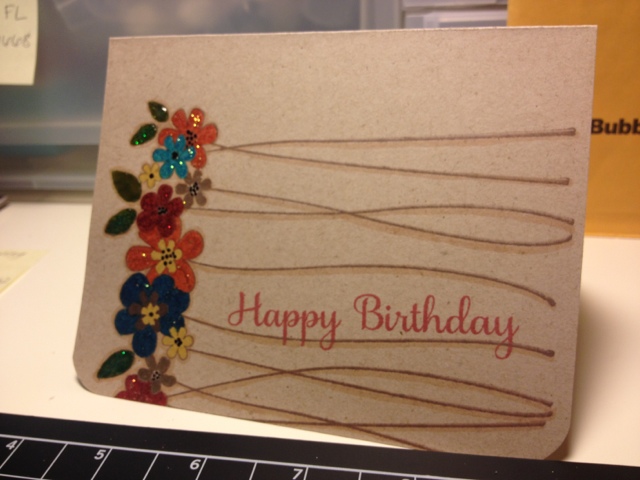
First card up is a complete replica of the card that Kristina Werner made in our class. I tweaked it a little with my supplies but for the most part its identical. Reason being is I NEEDED to master this as she did. I loved this card so much I had to recreate it myself. It was fun too. First time I colored with markers and although I have yet to splurge into the Copic world my memento and Stampin Up markers did the trick!

This card is from the lesson "One Stamp, Three Ways" Only I used this particular stamp once. The awesomeness about this card is the stamp is sideways :-) I KNOW...... awesome right!!!

Products Used:
Neenah Dessert Storm Kraft Cardstock
Hero Arts Clings Stamp - Tall Flowers
Memento Dye Ink - Rich Cocoa
Memento Dye Ink  -  Rhubarb Stalk
Stampin Up Markers - Brights Collection
Memento Dual Tip Markers - Arizone Canyons
Ranger - Glossy Accents
Ranger - Enamel Accents - Black
Ranger Stickles - Diamond
 
 
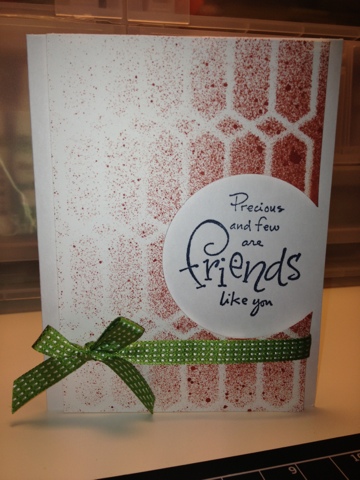
Below, you will find that I used one stamp two different ways or maybe three if you count the background on the card to the left. I had fun with this too creating a background with the stamp first then cutting it down to size, then popping up one of those hearts on foam dots. The second card I tried my best at emboss resist (I think that's what its called), where I embossed the heart and then fussy cut it out and then inked it with Tim Holtz distress inks. I popped it up on foam dots and then I added a heart border and some patterned paper. I finished both cards off with one of my favorite embellishments and that some Twine!!!!
 
Hope you like!!
 
Products Used (Left)
Stampin Up Cardstock - Primrose Petals
Neenah Solar White Cardstock
Stampin Up Stamp- You are Loved
Maya Road Twine
Stampin Up Ink - Old Olive
Memento Ink - Angel Pink
Memento Ink - Love Story
(Right)
Neenah Dessert Storm Kraft Cardstock
American Crafts Bakers Twine
The Paper Company Cardstock- Cool Metallic Cover Polar Ice
The Paper Company Cardstock - Purple Shimmer
Fiskar Border Punch - Hearts
ColorBox Archival Ink - Deep Grape
Tim Holtz Distress Ink - Concord Grape
Tim Holtz Distress Ink - Worn Lipstick
Carta Bella6x6 paper pad - Devoted


Thursday, January 31, 2013

Day 4 Clean & Simple


Hey Guys!!!

Only one card today but its from a style that's very close to my heart! Chalkboard! I LOVE IT!!!! Took me three tries to get it pristine but I think I did pretty darn good! NO SMUDGES!!!! whew, I think this card is the epitome of CLEAN & SIMPLE!!!


Products Used:
Black Core-dinations Premium Cardstock
Recollections Opaque Embossing Powder
Versamark Watermark Stamp Pad
Hero Arts Stamp - CL567 (where's the name HA?)
Lawn Fawn stamp - Harold's ABC's
Epiphany Crafts Shape Studio - Heart 25
Epiphany Crafts - Epoxy Hearts
Doodlebug Design Inc - Lovebirds 6x6 paperpad

Wednesday, January 30, 2013

Day 3 Clean & Simple

Ok, let me first start out by saying that PRACTICE MAKES PERFECT and apparently I need to practice more! lol, Today's lesson was Offset stamping using a Gradient technique. Jennifer made it look so stinking easy but let me tell you its not!!!!! I think I "captured" the essence of what she was trying to share with us today. BTW, the bow die that she uses from My Favorite Things is awesome, My bow........NOT SO MUCH!!!!!

Here is an example of what should be Gradient stamping
 
Products Used:
Neenah Solar White Cardstock
Stampin Up Ink - Primrose Petals
Stampin Up Ink - Summer Starfruit
Stampin Up Grossgrain ribbon
Technique Tuesday Stamp - Bright Idea
Hero Arts (Studio Calico) Stamp - My Happy
 
 
We all know how much I LOVE KRISTINA!!! Well if you didn't now you know. I love her technique and her style of instruction. One would say I'm a fairly intelligent individual however I felt all shades of illiterate when trying to stamp this card. As simple as it looks it took me 3 takes! The more I stamped the worse it got, So I just STOPPED! lol and this is what I was left with.


An example of Offset stamping at its worst! hahaha
(never mind the background clutter)
 

Products used:
Georgia Pacific White Cardstock (I was tired of wasting my Neenah)
Hero Arts (Studio Calico) Stamp - My Happy
Hero Arts (Studio Calico) Stamp - Heyday Sentiments
Stampin Up Ink - Primrose Petals
Stampin Up Ink  - Pretty in Pink
Stampin Up Ink - Rich Razzleberry
Stampin Up Ink - Pumpkin Pie
Stampin Up Ink  - Daffodil Delight
Stampin Up Ink - Raspberry Ripple
Stampin Up Ink  - Old Olive
 
So on to the next day and after all is said and done I will revisit these lessons and master them if its the last thing I do!!!
 
See ya tomorrow!

Tuesday, January 29, 2013

Day 2 Clean & Simple

Day 2

The next two weeks are going to be late nights and no exercise. I've been skipping my nightly workout to craft....Eek!!! But who can complain with the great instruction and inspiration that this class provides. I'll work out in the morning......I think! :-)

So here is a card that was part of Day 1's lesson that I just had to create today. Its so plain and simple yet so cute that I want to pinch myself.

The lesson was craftsmanship. Making sure you take pride in your work to get clean elegant edges and clean crisp stamping while prevent cracking in the paper and smudges of ink from fingers. I think I did pretty darn good! Whatcha think????


Products used:
Neenah Solar White Card Stock
Recollections Red Card Stock
Hero Arts Woodgrain Background Stamp
Simon Says Stamp Plenty of Hearts Stamp and Die
Simon Says Stamp Loving Words Stamp
Doodlebug Dear Heart Washi Tape
Provo Craft Terrifically Tacky Tape
WOW Glitter - Gold


So on to today's lesson.... Single layer cards. I dont think Ive ever made a single layered card but boy when I say it was easy peasy it was EASY PEASY! What took the most time is the mask. Something that was also my first and I think its my new fav!!!!! Although the colors didn't come out as I imagined (the hearts are pink and the words red) the inks were very close in color. However the technique worked and I was ecstatic with the outcome.


Products Used:
Neenah Solar White Cardstock
Eclipse Printing Adhesive Sheets
Simon Says Stamp YOU stamp set
Memento Dye Ink - Love Letter
Stampin Up - Primrose Petals
Parker Lower Alphabet Set Craft Die
Simon Says Stamp Mini Hearts Set
Stampabilities Faded Text Background stamp
Ranger Glossy Accents


Thanks For Stopping By!!!

Monday, January 28, 2013

Day 1 of Clean & Simple

A Blog?? I'm no blogger! At least until now!!!!

Since Ive started paper crafting back in August 2013 (yes, only 5 short months ago) I have fallen in love with all things paper. It started with my now 16 month old daughters birthday party that I insisted on doing everything myself for. That included making the invitations, that I have developed this obsession with making cards. I have spent endless hours on YouTube stalking those that have mastered this thing called Card making and during my steak-out I happened to come across a young lady by the name of Kristina Werner. That was for me! I literally watched her videos for hours on end daily in complete awe of her creativity. Since stumbling upon Kristina I have wanted to take one of her Online Card Classes but didn't get to partake until the Holiday Gifts Projects Bundle which I thought was awesome (I didn't get to make the Flashcard set that I wanted to because Ive been obsessing with Copic Markers but yet to take the plunge in buying any) So I couldn't wait until the next class was offered. My wish was granted in December when a new class for Clean & Simple 2 was announced. I immediately signed up......

Today is day one of that class that runs for 2 weeks and already I am in LOVE!!! There are three instructors including Kristina which include Julie Ebersol and Jennifer McGuire. These ladies are AWESOME at its best!!!!!

OK, enough of the girl crushing, here is the card that I made today.
The technique I learned today was misting. As you can see here mine is a little splotchy but I think it gives the card some character :-). There are a couple other techniques that Id like to try from today's lesson but time will only permit so much crafting in a single day and I have reached my limit. Its time to turn on Jillian Michael's and squat my night away!

Hope you like!!!!


Products used :
Neenah Solar White Card Stock
Mister Huey's Elongated Hexagons Mask
Mister Huey's Color Mist - Lucille
EK Success Circle Scissor
Inkadinkado Stamp set - Expressions
Stampin Up Midnight Muse Ink
Stampin Up Grossgrain Ribbon

Thursday, January 24, 2013

Valentine cards

A couple valentine cards using a few simon says stamp die and stamp sets.

I'm loving the hearts.


Monday, January 7, 2013

CArd 2 SSS January card kit

Hi, Anyone! lol

I thought Id try my hand at another card from the January Simon Says Stamp card kit. This card was made for a YouTuber of mine JenCali78. She has been so inspiration to me in getting started with videos on you tube and this was my way of saying Thank You!


I Hope you like the card! Thanks for stopping by!

~Aisha


Monday, December 31, 2012

The Beginning!

Hi World! It's me....Aisha

You've never met me, never heard of me, and probably only stumbled across my blog! However you got here and for whatever reason......I welcome you!!!!

This blog will mostly likely be soley about crafts. Im too private to allow anything more FOR NOW. However, I would like to become a little less private in areas concerning hobbies and all things fun!

My first entry will be a little more about how I started on this obsession with paper crafts.

I gave birthday September 9, 2011 to my second child after 11 years and I finally got the princess I had been longing for. Little girls are AWESOME!! So when it was 1st birthday time I wanted to do everything myself. I didnt care if it cost more than doing it professionally, I wanted all my sweat and love to go into creating a special first birthday. Well on this journey I decided to make her birthday invitations and although I spent 3 times what I would have paid to have them made, I think they came out perfectly and I couldnt have been happier.


After hours of YouTube videos, countless trips to the craft store and alot of awkward cuts on the cricut machine, I finally got the card that I wanted. Im so very pleased........

Since then this love, no I mean OBSESSION with paper crafting has taken on a life of its own. I enjoy it and wish I had more time and money to enjoy it.

Thanks for stopping by!

Aisha


Thursday, December 27, 2012

January Card Kit

One of these days I am really going to write a blog!

But that day isnt today! Today I just want to have a place to share the card I made using the January Card Kit from Simon Says Stamp.

I had a blast making it and I love how it turned out! I love even more that Ive only been paper crafting since september and im finding my creativity more and more with ease daily!

Enjoy